Removing the background from an image used to be the kind of task that required a Photoshop license, a steady hand, and an afternoon. In 2026 it takes about three seconds in a browser. But “fastest” isn’t always “best”—the right method depends on what you’re cutting out, what you’re putting it on, and how forgiving your audience is about a stray pixel here and there.
This guide walks through both approaches: the manual route for when you need surgical control, and the AI route for when you need a clean transparent PNG five minutes ago. Plus the cases where each one quietly fails.
Why You’d Want a Transparent Background
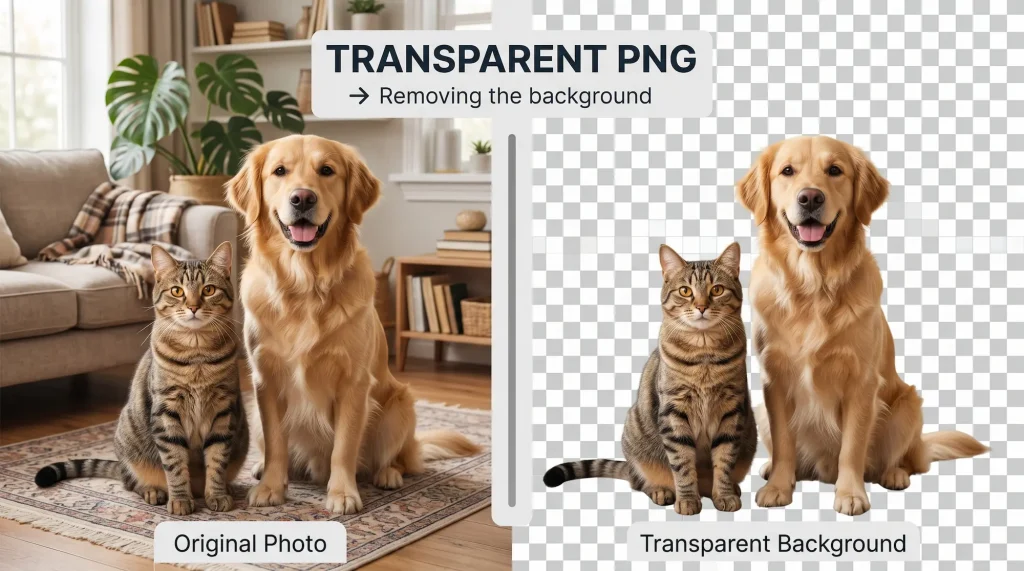
The use cases are everywhere once you start looking. Product photos for an e-commerce store look ten times more professional on a clean white or branded background than on the cluttered desk where they were shot. Profile pictures need to drop cleanly onto colored cards. Memes, thumbnails, presentation slides, photo collages—anytime you want to combine a subject with a different scene, you need that subject isolated from its original surroundings.
The output is usually a PNG file with an alpha channel, which is just a fancy way of saying “some pixels are transparent.” JPEG can’t do this, which is why you’ll never see a transparent JPEG anywhere—the format simply doesn’t support it.
The Manual Method
The classic approach uses an image editor like Photoshop, GIMP, Affinity Photo, or Photopea (which is free and runs in a browser). The basic flow is the same in all of them.
You open your image, select the subject using one of several tools—the magic wand for solid backgrounds, the lasso for tracing by hand, the pen tool for the most precise curves, or a quick selection brush that grows the selection as you drag. Once the subject is selected, you invert the selection, delete everything else, and save as PNG.
The advantage of going manual is total control. You decide exactly where the edge is. You can refine hair strands one by one. You can preserve transparency in glass or hair without the algorithm second-guessing you. For high-end product photography or print work, this control still matters.
The downside is obvious: it’s slow. A clean cutout of a person with curly hair against a busy background can easily take twenty minutes, and that’s assuming you know what you’re doing. For a one-off task it’s fine. For a hundred product photos, it’s a problem.
The AI Method
AI background removal uses a model trained on millions of images to predict which pixels belong to the subject and which belong to the background. The good ones are remarkably accurate—better than most humans with a magic wand—and they’re fast enough that you can drop in an image and have a transparent PNG before you finish your sentence.
The workflow is just: upload, wait two seconds, download. There’s no learning curve, no software to install, and no judgment calls about which selection tool to use.
Modern models handle hair, fur, semi-transparent objects, and complex edges that would take a human hours to mask by hand. They struggle with a few specific things: fine wisps of hair against backgrounds the same color, motion blur, glass and water, and subjects that blend tonally with their background. When AI fails, it usually fails in obvious ways—a chunk of background left behind, or a finger clipped off—so it’s easy to spot and either retry or fall back to manual cleanup.
When to Use Which

Reach for AI when speed matters, when you have a lot of images to process, or when the subject is a recognizable object the model has seen before—people, products, animals, vehicles. For 90% of everyday use cases, AI will give you a result that’s indistinguishable from a hand cutout in a fraction of the time.
Go manual when the image has unusual characteristics the model wasn’t trained on, when you need pixel-perfect edges for print, or when you need to preserve specific transparency effects (like glass or smoke). Also go manual when AI has tried twice and failed twice—at that point, more retries usually won’t help.
A hybrid approach works really well too. Run the image through AI first to get 95% of the work done, then open the result in an editor and clean up the few edges that need attention. You get the speed of AI and the precision of manual without doing either the long way.
Saving the Result
PNG is the standard. It supports transparency, it’s lossless, and every browser and design tool reads it. WebP also supports transparency and produces smaller files, so if your destination accepts WebP, prefer it for web use.
What you should not do is save a “transparent” image as JPEG. JPEG doesn’t support transparency, so any transparent pixels will get filled with white (or whatever the export background is set to), and you’ll wonder why your cutout has a white halo when you drop it on a colored card.
Don’t Forget to Crop
A common mistake after removing a background is leaving a ton of empty transparent space around the subject. That makes the file bigger than it needs to be and harder to position in layouts later. Crop the image to the subject’s bounding box—or close to it—before exporting.
Quality Tips
A few things to watch for regardless of which method you use.
Look at the edges at 100% zoom. AI cutouts sometimes leave a faint halo of background color along the edge—a sign that the model wasn’t sure exactly where the subject ended. A one-pixel feather can hide it, or you can re-export with a slightly tighter mask.
Check semi-transparent areas. Hair, fur, smoke, glass, and water all have pixels that are partially transparent, and how the cutout handles those areas determines whether it looks natural on a new background.
Test on the destination. A cutout that looks perfect on a checkerboard preview can look terrible on the actual background you’re going to use. Always preview on the real target before declaring victory.
Wrapping Up
The honest answer to “manual or AI?” in 2026 is “AI first, manual when AI can’t.” The models have gotten genuinely good, and the time savings are enormous. Keep an image editor around for the edge cases and the cleanup, but make AI your default and you’ll get back hours of your week. Your transparent PNGs will look just as good—and you’ll actually want to make more of them, which is the real win.